


Note: There will be no pages posted next week because I will be in New Mexico to buy parts for the house. The pier and grade-beam concrete pour is scheduled for next Wednesday and I am sorry I won’t be there to photograph it. But I hope I will have some great pix of house parts to post when I get back, and perhaps Jim can take some shots of the pour for me.
| September 7, 2007—Work on the grade-beam cages almost complete | |
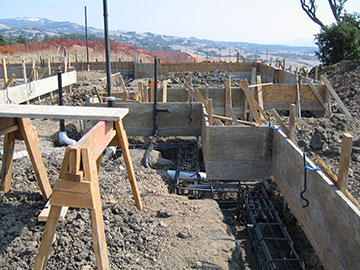 |
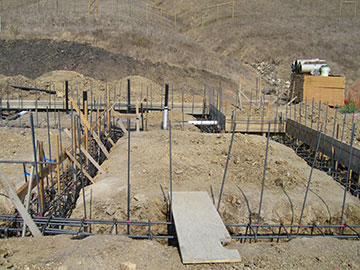
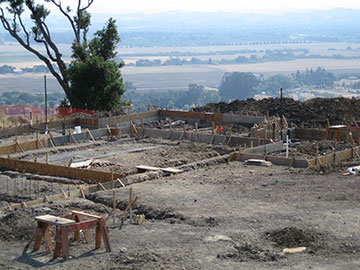
Jasmine and her crew worked hard all day to and are getting close to pouring concrete. It is amazing to see so many workers on the site and see how long it takes them to make the complicated steel cages for each trench.The inspector has been to the site once and the soils engineer has come and will write his report. Here we are looking from the northwest corner of the guest room toward the guest bath.The squiggly things attached to the form are tie-downs that will be embedded in the concrete of the grade-beam. |
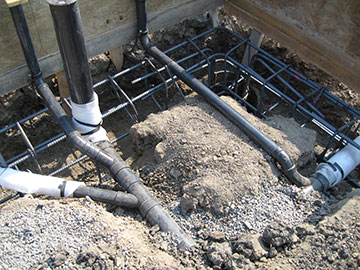 |
Here is the plumbing for the guest bathroom. The bathtub is toward the top of the picture and the toilet is on the left. The pipe going out of the photo to the left will go to the sink. The pipe going out of the photo to the right is the sewer line which goes out of the house at this point. The crew had to make the cages around the plumbing—which was already carefully set in place—without disturbing it. |
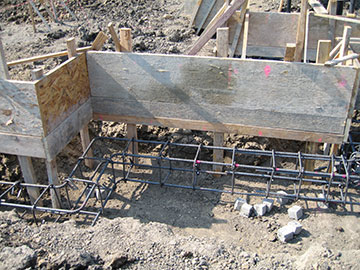 |
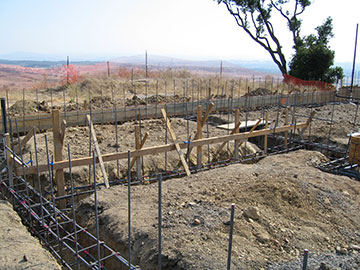
This large trench is the for the fireplace. It is important that there be enough support for a heavy masonry fireplace and chimney—although I think our chimney will actually be steel instead of masonry. This cage is not complete and I am sorry I will miss seeing the final cage under the hearth. The foundation plan shows the locations of the piers, the grade-beams and the shear-walls (interior walls especially built to take the force when the building is shaken from side to side) but is remarkably vague on other details, which are left up to the concrete contractor. The inspectors, both the county and the soils engineer come and critique but the concrete contractor must do some real design on a job like this one. |
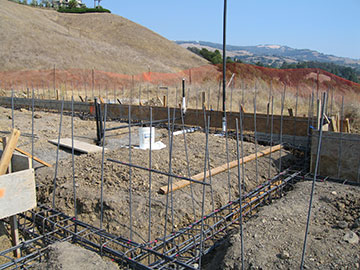 |
Here is the kitchen seen through the forest of rebar of the living room and dining room walls. Right where that piece of wood is lying on the ground will be where our stove will go. I have always noticed that a building looks amazingly small when you are putting in the foundation, larger after it is framed, and even larger when you put the drywall up. I can never figure it out—it seems counter-intuitive that an enclosed space would look larger than an open one. I think our minds are so accustomed to seeing rooms, that until they are closed in, we don’t perceive the scale properly. |
 |
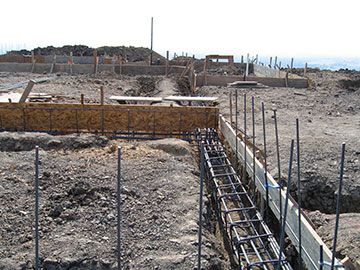
That board spans the master bedroom wall so you can walk through it into the master bedroom. Past the end of the foundation, there is a stack of what looks like cardboard boxes. And they are cardboard boxes, empty cardboard boxes which cost $200 each. These boxes will go under the slab and once the slab is hard, will deteriorate and disappear to create a void under the slab. When I found out how much the void-form boxes cost, I was appalled and complained bitterly that I was paying $75 a square foot for air. Then a friend pointed out that it wasn’t just air, but designer air, and that if the void-form was made in China—like everything else—that it was Chinese designer air. Now I feel much better. |
 |
The wall on the north side of the master bedroom will be a shear-wall. You can tell which interior walls will be shear-walls because of the extra staking, which is used to support tie-downs. The stakes support a horizonal piece of wood, which in turn supports the anchor bolts which will be embedded into the concrete. |
 |
Here we are looking from the wine storage room (definitely not a fancy wine cellar) at the northeast corner of the house along the front of the utility wing, then along the courtyard wall to the guest wing. |
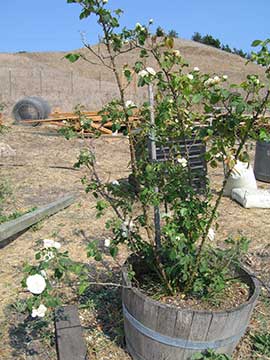 |
I took a picture of this rose, called Sombreuil, because it had been so unhappy and yellow. We have changed the sprinkler system around so it is coming off a different hose bib since the one we had been using is now under the guest room. The new hose bib does not have as much water pressure for some reason as the old one, so I have removed the pressure-reducer on this irrigation system all together. Even though this rose is still at the end of the line, it seems to be so much happier and is blooming like crazy. |
 |
Here is another picture of the house from the barn balcony. Now that the forms are going in, it is easier to get an idea of the layout. Next time I take pictures of this, there will be grade beams outlining the house. |
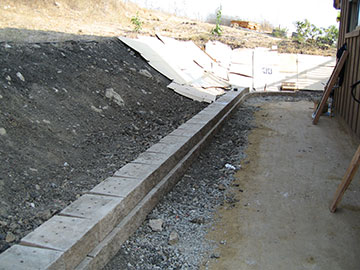 |
Here is a truly excellent two-course wall my assistant is building around the barn and guest cottage. We will wait to do the stretch around the guest cottage until the plasterers do their final coat and get their scaffolding out of the way. Kai suggested that we put this wall in to keep the dirt from washing down onto the path when it starts to rain. My assistant has filled in with loose soil behind the wall and we can plant something trailing to hang down over it. In keeping with the blue and white theme, I am thinking of star jasmine or rosemary. All the plants I have planned for this area are kind of trite, but I think when everything is in, it will look very nice. Anyway, the plan is never final until you buy the plants. |
 |
I will leave you with this image of General Debris and his menacing shadow on the cardboard below. What would we do without his vigilance? |
| back to top | |